Filters selectively limit the rows that are displayed in the grid. Narrowing down the data helps in viewing pertinent information at a glance while disregarding more peripheral data. To apply a filter to a grid:
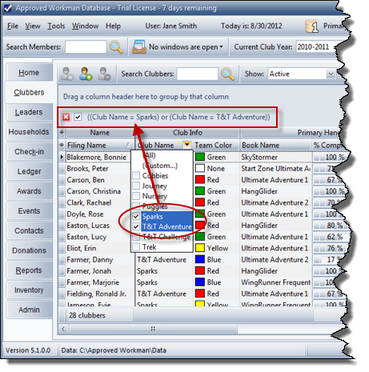
| 1. | Hover over a column header. A filter menu button appears on its right side. Click on the button. A check list of the unique values for the column is displayed. |
| 2. | Select one or more check boxes to indicate which records to display. For example, clicking "Sparks" will show only clubbers who are in Sparks. Clicking both "Sparks" and "T&T Adventure" will show clubbers who are in either club. |
| 3. | When finished, click out of the check list drop-down. The filter is displayed above the grid and the rows of data showing in the grid are adjusted. |
| 4. | To remove the filter, click the red 'X' button next to the filter display above the grid. |
| • | Additional filters can be added by selecting another column value. For example, to see a list of only the Female clubbers in Sparks and T&T Adventure, click on the filter button in the Gender column header, then use the drop-down check list to select "Female". |
| • | To temporarily disable the filter, click the check box toggle next to the filter display above the grid. |
| • | To customize the filter beyond what is available in the header drop-down menus, click the Customize... button found on the right side of the area above the grid (when a filter is already in use). |

|
Some filters are so common within a Module that they are included as Show drop-down menus above the grid. For example, in the Check-in Module, there is a drop-down menu that allows selection to show Clubbers, Leaders, or Clubbers & Leaders. These Show menus are for convenience and actually provide the same functionality as the column header filters.
|

