Any column header which contains “(Custom…)” in a drop-down menu can be customized beyond the options available in its drop-down check list. This provides great power in filtering the grid to show only select rows of data. When initially creating the filter, one or two simple conditions can be specified.
To add more conditions, or to make changes to an existing filter, use the more advanced Filter Builder tool. Filters can also be saved to use again without recreating them. To open the advanced Filter Builder tool, click the Grid button in the toolbar (the one with a gear) and select Custom Filter Dialog from the drop-down menu. (Refer to Changing a Customized Filter below.)
Creating a Customized Filter
| 1. | Select the column to filter by and click the filter button to view the drop-down menu. |
| 2. | Click the (Custom…) option to open a Custom Filter window. |

| 3. | Select the operator for the condition from the top left drop-down list. |
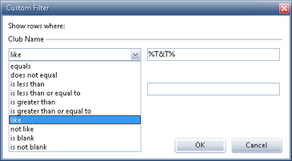
| 4. | In the field to the right of the operator, if applicable, type the value for the condition. |
| 5. | Once this top condition is completed, either click OK to run the filter, or add another condition. |
| 6. | To set more than one condition for the filter, select the AND or OR radio button. |

|
Using AND for the conditions will show only rows of data that meet both conditions. Using OR for the conditions will show all rows that meet either the first condition or the second condition.
|
| 7. | Fill in the operator and value for the second condition. |
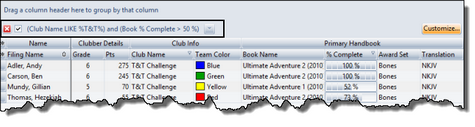
| 8. | Click OK. The filter conditions are shown above the grid and the data shown in the grid is adjusted. |
Changing a Customized Filter
 To make further changes to this customized filter (to add or remove conditions, or tweak the existing ones), click the Customize... button in the right hand corner of the area above the grid or select Custom Filter Dialog from the Grid menu to open the Filter Builder window.
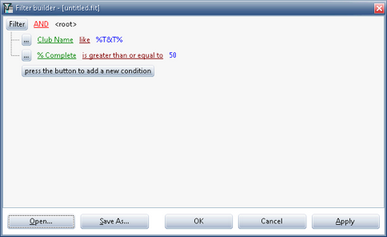
| • | To remove a filter condition, click the '...' button and select Remove Row from the drop-down menu. |
| • | To add a new filter condition, either click the '...' button and select Add Condition from the drop-down menu, or click press the button to add a new condition. |
| o | The new row will contain a default condition that, in most cases, should be modified. |
| o | Click on each piece of the condition to modify it. |
| o | Either click OK to apply the filter and close the window, or click Apply to check that the filter acts as expected, then Save it before dismissing the window. |
| • | To save the customized filter, click Save As... and then select where to save this filter, just as with another document. |
| • | To open/reuse a saved filter, first Create a filter (see above), then use the Custom Filter... button to open the Filter Builder window. Click the Open... button and select a saved filter. |

