The Order Window |

|

|
|
The Order Window |
|
|
The Order Window |
|
|
|
The Order Window |
|
|
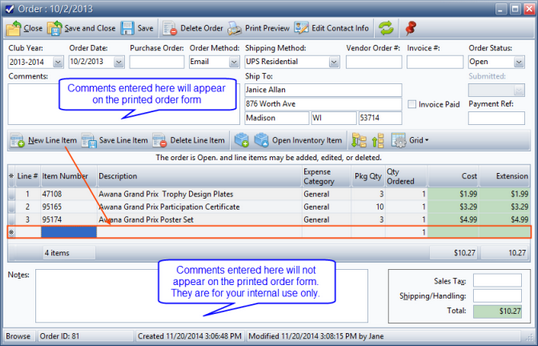
![]() Opening or creating a new Order opens the Order window to view, modify, or enter details of an order.
Opening or creating a new Order opens the Order window to view, modify, or enter details of an order.
|
Creating an order within AWdb does not actually place the order with Awana Clubs International, but can assist in placing the order. |
Icon |
Action |
Description |
|
Close |
Closes the Order Window without saving current changes. |
|
Save and Close |
Saves the changes and then closes the Order Window. |
|
Save |
Saves the changes and leaves the Order Window open. |
|
Delete Order |
Removes the current Order. |
|
Print Preview |
Displays the order in a format appropriate for e-mailing or faxing to Awana Clubs International. It uses the information under Admin > General > Supply Order - Default Values page. Printing is done from the Preview window. |
|
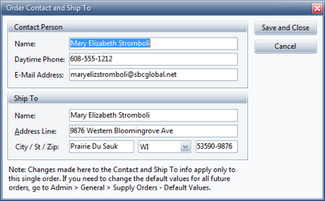
Edit Contact Info |
Opens a dialog to edit the Contact and Ship To information for this order which will override the Admin > General > Supply Order - Default Values. |
|
Refresh |
Refreshes the data currently displayed in the Order Window. |
|
Stay On Top |
Toggles whether or not the window stays on top of the main window. |
The general information about the order is located just below the toolbar and includes:
| • | Club Year - defaults to the current club year but can be changed. The Inventory's Order grid can be filtered on the Club Year to list only orders within the selected club year. |
| • | Order Date - defaults to the current date but can be changed. |
| • | Purchase Order, Order Method, Shipping Method, Vendor Order #, Invoice # - details relevant to the order. |
|
The Shipping Method values are customizable under Admin > Generic Lookups > Shipping Methods. Set a default for the Order Method and the Shipping Method under Admin > General > Supply Order - Default Values. |
| • | Order Status - defaults to Open when a new order is created. Options include: Open, Submitted, Received, or Closed. The status determines what functionality is available. See the Line Items section below for details on changes based on status. |
| • | Submitted date - set automatically when Order Status changes to Submitted, but can be changed. |
| • | Comments - notes to be printed on the order form. This is useful if the order is mailed, e-mailed or faxed. |
| • | Invoice Paid - indicates the invoice has been paid. Enter additional information in the Payment Reference field. |
| • | Notes - additional information related to the order that does not need to be printed on the form. |
| • | Sales Tax and/or Shipping/Handling costs - enter the amounts. The Total for the order is automatically calculated. |
![]() The default Contact and Ship To information used on most orders should be set under Admin > General > Supply Order - Default Values. To use different contact and shipping information on the current order, click Edit Contact Info to display a dialog for setting those values.
The default Contact and Ship To information used on most orders should be set under Admin > General > Supply Order - Default Values. To use different contact and shipping information on the current order, click Edit Contact Info to display a dialog for setting those values.
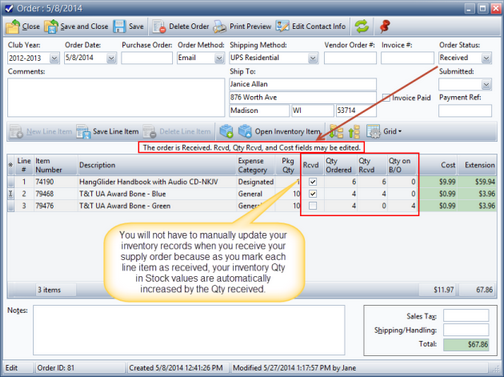
![]() The line item grid behaves differently depending on the Order Status value as follows:
The line item grid behaves differently depending on the Order Status value as follows:
| 1. | Open - indicates the order has not yet been placed. This is the default when the order is created. Line items can be added to the order. Each item should have a line item entry in the grid. The following tools are used while the Order is Open to add the line items: |
Icon |
Action |
Description |
||||
|
New Line Item |
Creates a new row. Either select from the drop-down list or type an Item Number or Description. Update the Expense Category and Qty Ordered fields if needed. The Line #, Pkg Qty, Cost, and Extension are filled in automatically.
|
||||
|
Save Line Item |
Saves the changes to the Line Item. |
||||
|
Delete Line Item |
Removes the selected Line Item from the Open Order. |
||||
|
New Inventory Item |
Opens a blank Inventory Item Window to create a new item if an item does not exist that needs to be added to an order. Once the item is created, then click the New Line Item button to add it to the order. |
||||
|
Open Inventory Item |
Opens the selected item in the The Inventory Item Window in order to see more details. |
||||
|
Grid Tools |
Lists actions related to the grid such as: saving or resetting a grid layout, or exporting data. |
| 2. | Submitted - indicates the order has been placed. Setting this status fills in the Submitted date. It prevents line items from being added, changed or deleted. |
| 3. | Received - indicates the order has been delivered. Setting this status adds the Rcvd, Qty Rcvd and Qty on B/O (Quantity on back order) columns to the grid. As an item is marked as Rcvd, the Qty Rcvd defaults to the total Qty Ordered and the Qty on B/O defaults to zero. If an item was back ordered, update these values as needed. As each Line Item is marked as received and posted, the quantity received is automatically added to the Item's Qty in Stock. |
|
Inventory item cost values can be updated by making corrections to the Cost field for a Line Item on the Order Form. If adjustments need to be made to a cost while checking in received orders, make the correction on the line item and the new cost will be updated in the matching Inventory Item record. |
| 4. | Closed - indicates everything related to the order is completed. Setting this status prevents the line items from being modified. |
The Expense Category field identifies a budget category for each item. The default value is based on the corresponding Inventory Item record's Expense Category value, but can be changed in the Line Items grid. The selection options are determined by Admin > Generic Lookups > Expense Categories.
|
To quickly get a total of how much is being spent on an order from various budget categories, drag the Expense Category column header into the grouping area above the grid. (Note: If the Group By box isn't showing, click the Grid button in the toolbar and select "Show Group by box".) |
If not using the Expense Category feature, go to Admin > Options > Inventory and Ordering. Clear the check box for "When adding new line items to an Order, display the Expense Category columns and populate it with the default value as set in the related inventory record".