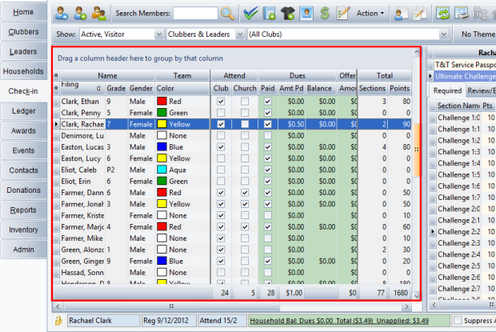
Use the Check-in grid to perform data entry tasks related to tracking Check-in items such as: Club and Church Attendance, Dues Pd, Offering Amount, Uniform, Bible, Book, Bonus, Visitors, Game Points, etc. Most columns are check boxes for quick and easy data entry. Some columns, like Game Points and Other, allow numeric values to be typed directly in the grid.
Key Points
| • | Use the Show: components in the toolbar to get a custom view for a specific data entry task. For example, set the grid to show only Active clubbers in Sparks. |
| • | Use the incremental search capability to quickly locate a specific clubber. For example, click anywhere in the Last Name or First Name column then start typing a few characters and the focused row will move to the matching record. To release the incremental search, press ESC. |
| • | Turn on the Speed Check feature to avoid constantly repeating clicks for Uniform, Bible, and Book, so those columns are automatically checked as soon as the Attend Club column is checked. Configure which check boxes are affected under Admin > Options > Check-In. |
| • | Mark (or clear) attendance for multiple members at once by multi-selecting records and using the Action drop-down menu or right click pop-up menu option of Set Attendance > Present/Not present. |
| • | Click in the Game Points cell and type the actual numeric value to enter points earned for Game Time. |

|
To award points to everyone on a particular Team Color, drag the Team Color column header into the area above the grid to group the records. All of the Blue Team members are together, then Green members, etc. Type the number of points to award in the Game Points cell, then press the down arrow and type the point value and then press the down arrow until all of the rows for that team are completed. (You might first want to filter the attend column to show only those who attended.)
|
| • | Change the Team Color assignment by clicking the cell and selecting a different color. A change in Team Color applies to the current week or all future weeks, depending on the response to the pop-up dialog. The Team Color value for prior weeks is not changed in order to preserve historical data. To change the Team Color for a prior week, adjust the Current Club Date in the main toolbar prior to making the change or open the Member record and make the change on the Attendance tab for the desired week. |
| • | Excuse an absence by selecting a clubber/s and then using the Excuse > item under the Action menu (or from the right click pop-up menu). |
| • | View valuable statistics by grouping on Team Color, Team Name, or Leader Name. Drag the appropriate column header into the grouping area above the grid and notice the statistics shown for each node: Number of Members, Number Present, Total Points, Average Points Per Clubber, Total Required Sections completed, and Average Number of Sections per Clubber. |
Dues and Posting payments
| • | Hide the Dues header band if weekly dues payments are not collected. |
| • | If weekly dues payments are collected, click the Dues Pd check box when a single weekly dues amount is received. However, if weekly dues are $0.50 but a clubber pays $1.00 or more, type over the default Dues Amt Pd and change it the received amount. |
| • | Any amount entered in the Dues Amount Pd cell is assumed to be cash and is applied exclusively to the dues for the selected clubber only. Thus, if dues money is paid that is for more than one clubber, mentally divide up the amount and apply it to each clubber separately. |
| • | For money received for books and uniforms, do NOT check the Dues Pd check box or type any value in the Dues Amt Pd field. Instead, open the Household Ledger and post the payment there. Any money applied to Fees representing Dues will cause the Check-in grid's Dues related check boxes and fields to be automatically filled in. |
|
A quick way to open the Household Ledger is to use the money sign button in the toolbar, or use the link below the Check-in grid in the status bar.
|

