The Registration Window Dialog |

|

|
|
The Registration Window Dialog |
|
|
The Registration Window Dialog |
|
|
|
The Registration Window Dialog |
|
|
![]() The Registration Window provides a single point of access for the multiple tasks related to registration. Review and edit household and individual member information, select members to register, assign books and uniforms, review fees, post payments, and print registration related reports.
The Registration Window provides a single point of access for the multiple tasks related to registration. Review and edit household and individual member information, select members to register, assign books and uniforms, review fees, post payments, and print registration related reports.
Step 1 is divided into three sections: Household, Contact Info and the Individual Member section.

| • | Household - current household information is shown and can be edited directly. |
| • | Contact Info - current contact information is shown. To add/edit/delete contacts, double click a row to open the E-Contacts dialog. |
| • | Individual Member - separate tabs for Clubbers and Leaders. Each tab has two read-only grids that provide information useful when registering members. To make changes, open the Member Window by double clicking on a row or using the Open Member button on the toolbar. Update information, then Save and Close the member record to return to the Registration Window. |
Icon |
Action |
Description |
|
Registration Date |
The date defaults to the current club date but can be changed. |
|
Show |
Filters the data in the grid based on Status. Select the boxes in the drop-down list to indicate the status(es) to display. |
|
Open Member |
Opens the selected member in the Member Window. (Pressing the Enter key with a row selected or double clicking the row also opens the member record.) |
|
New Clubber (in this Household) |
Opens a new member form pre-filled with the selected household's information. |
|
Assign Handbook |
Opens the Assign Handbook dialog to assign a new handbook to the selected member. |
|
Assign Uniform |
Opens the Assign Uniform dialog to assign a new uniform to the selected member. |
| • | Register - sets Registration Current and registered date in the Member Window's Misc tab when the record is saved. It also sets the Permissions-related fields, the member's Status to "Active" and creates a fee for the Annual Dues (if applicable). |
|
Review Club Assignment, Current Book Assignment and Current Uniform. If new items are needed, use the buttons above the grid to open the appropriate assignment dialog. |
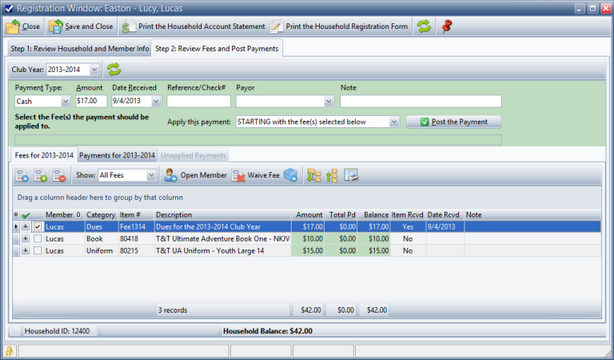
Step 2 shows the Household Ledger. See the Household Ledger section for additional information.
|
Review fees that were created automatically. Use the New Fee button to add additional items. Post payments, then print a Household Account Statement or a Household Registration Form. The registration form includes an option to "Display a summary of Fees and Payments in the Office Use area" to use it as a receipt of payment or a bill for an unpaid amount. |
Icon |
Action |
Description |
|
Save and Close |
Saves the changes and then closes the Registration window. |
|
Print the Household Account Statement |
Opens the Household Account Statement report dialog for the selected household. |
|
Print the Household Registration Form |
Opens the Registration Form report dialog for the selected household. |
|
Refresh |
Refreshes the data in the window. |
|
Stay on Top |
Toggles whether or not the window stays on top of the main window. |